Overview
This guide is primarily designed to discuss low poly modelling techniques, but many of the techniques used are very relevant to high poly modelling too, and the application of these techniques in high poly modelling will often improve your modelling skills, speed and overall model quality.
There are a large number of tools and methods available to a modeller, including poly/mesh, subdivision, NURBS, patches and so on, but some of these techniques will not lead to a good low detail model. This guide will primarily deal with poly and mesh modelling as this is the most common way to build low poly models. This guide has been built around 3D Studio Max, but the concepts can be applied in many other 3D applications.
So, on to the modelling!
Concepts
When building a low poly model there are a number of considerations. How many triangular polygons are allowed? How many textures can be used and what size? Will the game engine support transparency, normal mapping, bump mapping or specularity? Additionally, you need to be aware of modelling techniques that can improve and, more importantly lower the performance of a model within a game engine. Holes in the mesh, hidden surfaces and overlapping polygons can have unexpected and undesirable effects on the engine, with poor unwrapping leading to some nasty visual effects such as texture stretching and inconsistent detail levels.
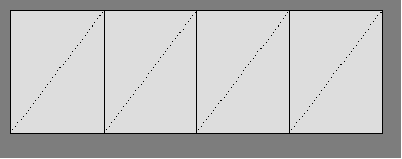
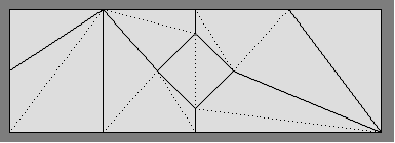
In addition to the more obvious and visible mesh glitches, game engine performance can be affected by poorly laid out triangles. Ideally for optimum performance the model will use triangle strips rather than random placement, though this is not always possible. Most modern engines will handle random placement reasonably well, but if possible, try to use strips.
A good example:
A not so good example:
When starting to build a low poly model, there are some useful techniques that you can employ. Here are some of the more useful ones.
Editable Poly versus Editable Mesh
When you have created your model, you will need to check the triangle count, not the polygon count to see if you are within budget. Editable Mesh is the best way to convert your mesh into triangles instead of polygons. However, in Max there are a large number of limitations to the Editable Mesh modifier that are better handled by Editable Poly. Poly offers you options such as Hinge From Edge, Extrude Along Spline, Bevel, Outline, Inset, Chamfer and Target Weld directly in the Editable Poly modifier tab. These options will give you more power and control when creating your model. Perhaps the best option is to utilise the object stack so that your Editable Poly has an Edit Mesh modifier above it at all times.

Hinge From Edge
Select the polygon sublevel to use this option. Select one or more faces and click the main button for free form, or the small button to the right to view the options which can be manually changed. Select the edge that you wish to hinge from and the selected polygons will rotate about that edge.
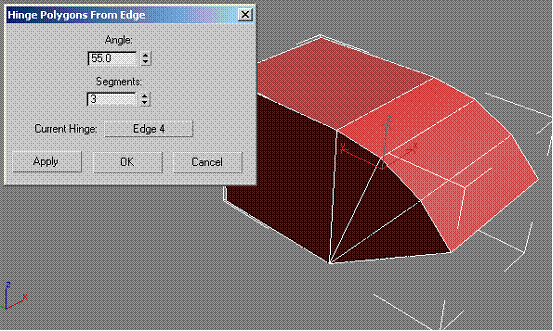
There is one thing to note here. If you select two or more faces then you may need to weld vertices to optimise the model.
Extrude
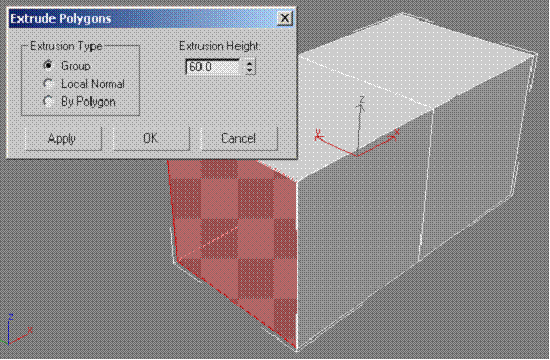
Extrude is normally considered to be something you do to faces, but with Editable Poly you can extrude edges and vertices too. Extruding a vertex will create a spike with the selected vertex as the point of the spike. Extruding an edge will create a wedge with the original edge being the top of the wedge. If you have an open edge then you can simply shift-drag the edge to extrude the edge, though bear in mind that the face that is created will be single sided.
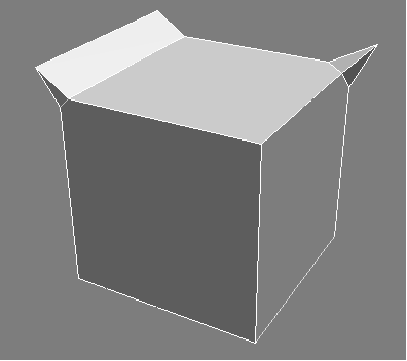
The Extrude option also has two buttons for freeform and manual input.
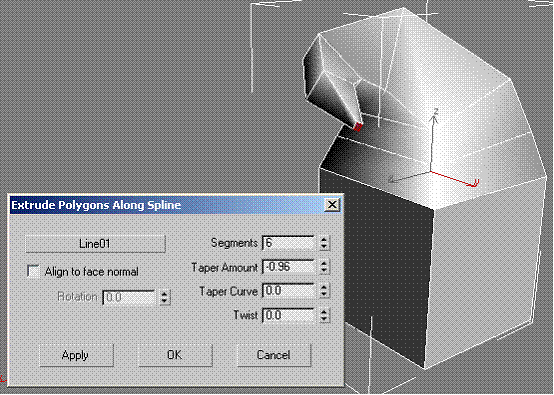
Extrude Along Spline gives you the option to extrude one or more polygons along a pre-drawn spline, including the ability to taper the extrusion.
Bevel
Bevel only works on polygons and is used to extrude and size the extruded face in one go, instead of extruding normally, then using the scale tool to resize the extruded face. Bevel can cause polygon overlapping if you are reducing the size of the extruded polygon and there are a number of vertices that are close together.
Chamfer
Chamfer is used to smooth out curves. If you select a single edge or a vertex and choose chamfer, the effect is that the subject is split such that the new sub-objects follow the average of the normals surrounding them.
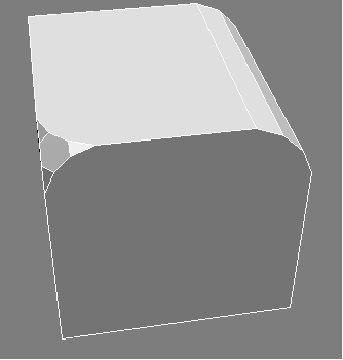
The right hand edge of the cube was chamfered, then the two edges that were created were also chamfered to smooth the edge of the box. The left hand corner vertex was chamfered, creating three vertices, which were then chamfered again to create the smoothed corner effect.
Inset and Outline
These two options allow you to quickly refine polygons. Inset takes the selected polygons and creates a smaller version of the selection within the original selection. In this case, the front polygon was selected and inset.
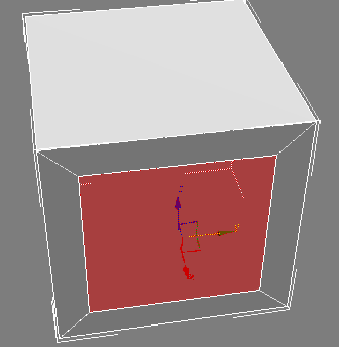
Outline retains the contours of the original object but effectively scales the selected polygons around the centre of the selection.
Target Weld
Target Weld effectively allows you to drag a vertex or open edge onto another vertex or open edge and weld the two together. This is more powerful than the standard weld tools as you do not need to spend time move the vertices into close proximity first to achieve the weld; you simply drag and drop to weld.
Cut and Slice
Cut and Slice are options which allow you to refine the object by subdividing faces and edges. If you select a sub-object then the Slice modifiers will only apply to the selection, whereas cut can still be applied anywhere. You should be careful using these tools as they can lead to some undesirable results, but can be very powerful when used correctly.
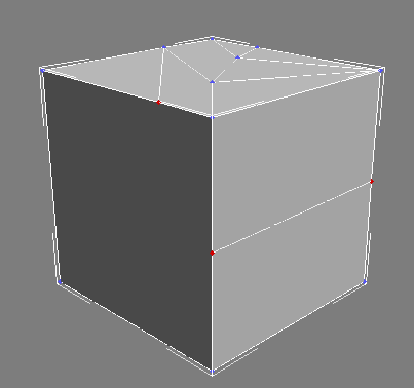
Cut was used to create the hard edges on top of the cube. A slice plane was used to create the front face through selecting just the front face then applying the slice. The red selected polygons are potentially problematic as the hidden edges may not be correctly turned, leading to undesirable mesh errors. Cut always creates hard edges which may not be desirable. Edit Mesh allows you to turn hard edges, but you cannot retriangulate a hard edge in Editable Poly, which conveniently brings us on to
Edge turning
On the previous cube, only hard edges were being shown. Enabling hidden edge visibility shows the following edge configuration.
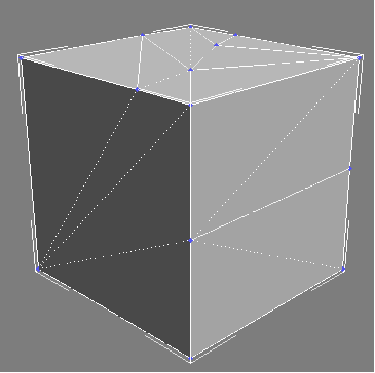
In this case, the edges are actually reasonably well aligned as there are no hidden edges overlapping the solid edges. Edge turning gives you the ability to change the direction of an edge, but in Editable Poly mode you can only turn the soft edges. In the simple example of the cube this will not have a large effect, but on a curved or uneven surface the effect on smoothing and mesh consistency can be much more dramatic. The soft edges can be turned to have the following effect.
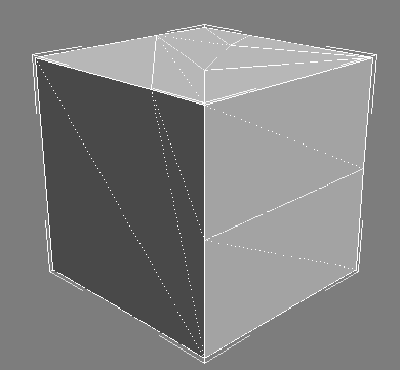
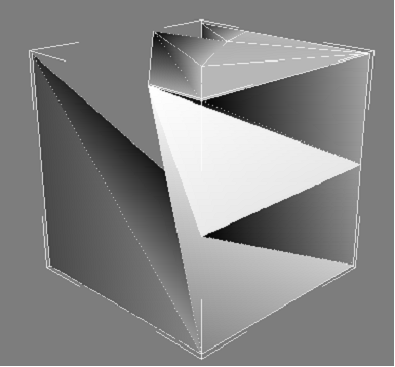
Turning the original hard edges of the cube using Edit Mesh can have a much more dramatic effect.
Symmetry
If you are creating a symmetrical object it is often easier to build one side and then mirror it. The Mirror modifier will do this, but you will then have to weld the seam together. The Symmetry modifier is more powerful as it can automatically close the seams. A normal sphere was created, then the symmetry modifier was applied and the mirror point moved slightly to the left. The following image shows the sphere before and after the modifier was applied.
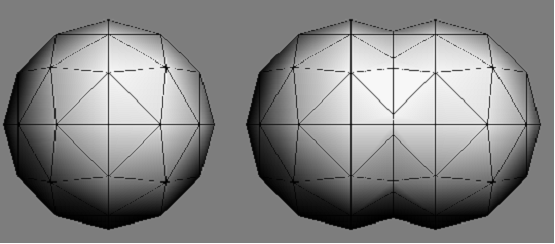
The stack for the object on the right is as follows
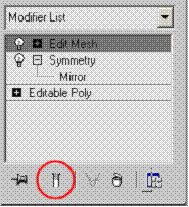
The circled button is also a useful helper. Selecting the bottom level of the stack (Editable Poly) and then clicking the button will show the effect of the whole stack in the viewports. This is useful to show the effect on the whole stack of editing the selected level of the stack. If a vertex is moved at the bottom level and there are many modifiers in the stack then that single move could have huge repercussions for the final model when the stack is applied, so this allows you to see the effect without having to continually move between stack levels.